So you have a website, and you’re getting traffic – but the sales aren’t rolling in. Or maybe they are, but they’re not setting the world on fire.
All too often websites are built with little or no consideration given to their usability. And this is often the critical difference between good and great websites.
For those of you unfamiliar with the term:
“Usability is the extent to which a website can be used by specified users to achieve specified goals with effectiveness, efficiency, and satisfaction in a specified context of use. In other words, good usability implies that users can easily use a website and by doing so, reach their goals quickly and without getting lost or confused.”
For an existing website, the first steps to improving usability are of course assessing the current levels of effectiveness, efficiency and satisfaction of users.
To help you with this process, here are essential website usability tools to start the process.
Clicktale allows you to visualize your visitors activity and get an overview of complete browsing sessions. It also watches behaviour analytics, which include click heatmaps, mouse move heat maps, and web analytics. These can help improve usability and conversion rates.
CrazyEgg enhances your sites usability by keeping a track of pages i.e. it can watch over your website and have an overview of heat maps to track the clicks. It can also track the advanced activities such as top fifteen referrals, browser and search terms.
Feng GUI simulates human vision during the first 5 seconds of exposure to visuals, and creates heatmaps based on an algorithm that predicts what a real human would be most likely to look at. Feng-GUI Dashboard offers designers and advertisers, a pre-testing service that measures the performance of your design, before it airs, by analyzing levels of attention, brand effectiveness and placement, as well as breaking down the flow of attention.
Fivesecondtest helps you fine tune your landing pages and calls to action by analyzing the most prominent elements of your design. By finding out what a person recalls about your design in just 5 seconds you can ensure that your message is being communicated as effectively as possible.
Google Website Optimizer allows you to set up different versions of your web content and then it random displays the versions to different visitors. This form of multivariate testing help you establish which versions are most user friendly and lead to higher conversions.
Loop 11 is a solution for consultants, designers and web managers to get the metrics and optimize a website’s potential. It has an easy process to create a professional usability test, accumulate responses and source them via a social media and finally analyze the data through the usability metrics.
Usabilla integrates usability tests in your daily work-flow and helps you continuously improve your web site’s user-experience and conversions with high quality design feedback.
User Testing is a way of getting data on your visitors’ browsing patterns — data that isn’t biased or subjective; data which shows the real activity from people using your website.
UserTesting provides on demand user testing. Post your website usability test requirements on their website and get direct feedback from real users via participant videos of activities completed. With a large database of users, you can target exactly who completes your tests.
Of course there’s plenty of other tools out there which can help you improve your website’s usability. The key is to get started with the process. Whether you invest in one of the tools above or just start looking at some of the basics through Google analytics – once you’ve started testing, you can start improving.
Having been in the web development life cycle for many years, I have learned the reality of trying to stick to HTML/XHTML best coding practices, which include being as much W3C compliant as possible, but in the real world, not all web browsers are created equal, that we can only wish!
It is still most beneficial as a programmer to follow a standard flow of key decision choices, that is to keep future modifications and improvements easier and leads to quicker maintenance of your current website’s needs. It can also be easier for people new to your project or site to get acquainted with how its setup in both the front-end and back-end aspects of it.
While being able to have a nice shiny W3C compliant badge, may be cool, it surely does not mean that your site is going to just simply look the exact same in the currently most used web browsers by your visitors, let alone any really older or non-common web browsers.
In fact, having such a badge, and forgetting to check the compliance results from W3C’s online tools, may lead to a negative effect, where the visitor clicks on it, and because you didn’t confirm every page is complaint, one single html, xhtml or css level error will display a nasty non-compliance screen.
That is something you want to avoid, as it makes your site seem as if it was poorly put together, which is most likely not the case at all. As you can see above, even big name sites, do not follow compliance, and may even have hundreds of erroneous reports from online compliance validation tools, while their website looks and functions without any issue.
The best recommendations I have for people is to keep your code as clean and human readable as possible, along with attempting to follow standards as much as you can, and if you need to utilize some non standard, or non compliance code, its fine, go ahead.
Truly, as long as your website fully functions properly for your audiences needs, you are actually ahead of the curve. A lot of sites still to this day have things that do not work in Firefox or Chrome, and only work properly in Internet Explorer, sometimes even specific older version of it.
Another thing to consider is switching your document type, as typically I utilize XHTML with Transitional, meaning some “older” style HTML is allowed, such a table-specific items, this may allow what you were trying to accomplish and might put you that much closer to compliance validation.
Also keep in mind to always cross browser test not just in each web browser, but also in many different (most commonly used/recent) versions, and on different computers, as things like font sizes and generic style sheet rules may surprise you on a certain combination of browser, version and operating system.
Bonus Tip: Different sites will attract different user types, meaning even further potential browser support that you must maintain, you should utilize tools like Google Analytic’s to identify which browsers your visitors are using.
If you have any questions or comments, feel free to reply. Thanks!
301 redirects are essential when you’re redesigning your website and don’t want to lose the search engine traffic that you currently enjoy.
The unfortunate thing about a 301 redirect is that it sounds so extremely geeky and off-putting to the average business owner that they’re scared away. That’s too bad, because it is a critical tool in search engine optimization. So, to that end, I’m going to attempt explain the benefits of 301s in the least geeky way possible.
Search Engines and Trust
There are a lot of variables in why one site ranks higher than another site at Google and other search engines. One is how long the site (and a given page) has been in existence, and another is how many incoming links a page has. All things being equal (which they never are), older pages rank higher than newer pages and pages with more inbound links rank higher than ones with fewer inbound links.
Breaking that Trust
Often, when rebuilding a site, you end up changing the URLs–or addresses–of your web pages. Maybe it’s because you’re reorganizing your site, or maybe it’s because you’re redeveloping your site on a content management system like WordPress, Drupal or Joomla. In either case, the new URLs don’t have the trust that the old URLs do, even if a lot of the content is the same.
It’s like moving to a new town. You may have been the greatest manager/plumber/accountant in your old town, but that doesn’t mean anything in the new town. You haven’t changed; you still have an excellent bedside manner or mad sales skills, but you’re starting from scratch in this new town.
When you take your established content, uproot it and replant it somewhere else on your site, you are resetting the clock on when that content was created and breaking all of the inbound links that pointed to it.
Reestablishing that Trust
There are many ways to tell the search engines that you’ve moved your content, but the most search engine friendly way is the 301 redirect. By setting up 301 redirects for your content, you show search engines where your content has moved from, and your inbound links will now direct to your new pages.
How you setup your 301s may depend on the type of host you have. If you have no idea what I’m talking about, it’s time to talk to your web developer and get them involved.
If you want your web developer to create redirects for you, I recommend writing up a guide for him or her to show where the old pages should be redirected. Here’s a guide for you to use, where the first item is the old page and the second item is where you want the traffic to flow:
301 redirects are also great when you are changing from one domain to another (never a great idea, but sometimes a necessary evil.) Even with a 301 redirect, you should expect a dip during a major overhaul of your website. However, my own experience has been that the numbers get back to normal in about a month or three and then you see increases after that.
Is your unoptimized website bleeding money due to a slow average page load time? This guide will show you how to optimize your .htaccess (apache) file to implement speed improvements.
Just a one second delay in page response can result in a 7% reduction in conversions, and 40% of users abandon shopping carts that takes more than 3 seconds to load, according to KissMetrics. With more users making purchase decisions on mobile devices each year, page load optimization won’t patiently wait on your back burner any longer without affecting your bottom line.
Fortunately, there are several effective tactics to speed up your website without even touching your main website code. Even if you have little experience with .htaccess or server modification, this detailed guide will give you the tools and knowledge to take a bite out of your page load.
What is .htaccess?
Glad you asked. An .htaccess file allows you to modify Apache web server configuration settings without modifying the main configuration file – in other words, you can customize the way the server behaves while keeping the core settings intact, much like using a child theme in WordPress. Most webhosts allow clients to use .htaccess files, but if you’re not sure, check with your host.
How Do You Use .htaccess? Simply open any text editor and create a new file called .htaccess. Could it really be that simple? Well, yes and no. Most likely, your computer will perceive the .htaccess file as an operating-system file and hide it from view. To see the file, you’ll need to follow a guide like this one from SitePoint to show hidden files. Once you have that taken care of, you’re ready to move on!
Some considerations before you start: When editing .htaccess files, minor mistakes in syntax can break your site. Therefore, it’s always a good idea to back up any existing .htaccess files (if applicable) before you begin editing. If necessary, you can comment out an existing line by using the # symbol at the beginning.
Some of the common ways an .htaccess file can get broken:
Bad syntax – in other words, improperly formatting the code.
If you make .htaccess edits through cPanel, they can conflict with changes you made by hand.
With the proper precautions and a reliable source to copy and paste code from, there’s no reason not to take advantage of .htaccess to improve your site.
7 Tricks for Improving Site Speed with .htaccess
On to the good part: how can we harness the power of .htaccess to improve page load time? Try one (or all!) of these 7 tried-and-true customizations:
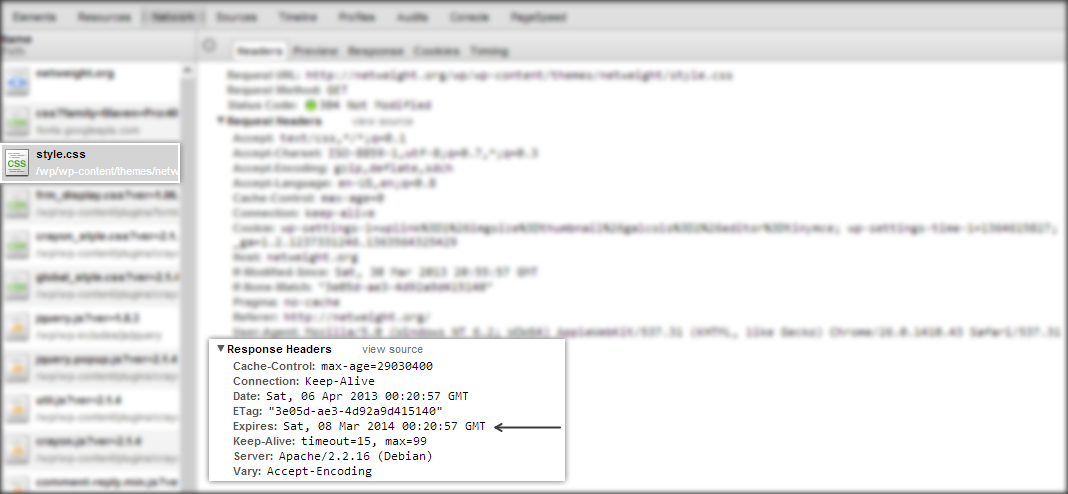
Turn on content caching Google recommends caching all static (permanent) resources – including Javascript, CSS, media files, images, and more. Caching saves these resources to the user’s local memory so files don’t need to be downloaded for repeat visits. This modification alone can significantly reduce page load time – not to mention bandwidth usage.
While some servers will cache a few static resources by default, it’s best to explicitly tell your server to cache all of them. More importantly, the default expiration period for cached entities is one hour, while Google recommends a minimum of one month, and even up to one year (but no more than that).
To ensure the server is caching all static resources and for the maximum time recommended by Google, we’ll be using mod_expires. Open .htaccess and paste the following inside:
# Set up caching on static resources for 1 year based on Google recommendations
<IfModule mod_expires.c>
ExpiresActive On
<FilesMatch "\.(flv|ico|pdf|avi|mov|ppt|doc|mp3|wmv|wav|js|css|gif|jpg|jpeg|png|swf)$">
ExpiresDefault A29030400
</FilesMatch>
</IfModule>
You see whether it’s working by viewing the headers for a file on your server. Using Chrome, open the developer tool and go to the Network tab. Reload your page and click on a css file. Make sure you see the expires date in the response headers:
Compress output with gzip This .htaccess modification compresses the size of the resources as they’re being downloaded to the user’s browser, thereby increasing page load. By default, it won’t compress anything below 500 bytes — which is a good thing, because compression below that size can ironically increase load time.
To utilize this mod, copy and paste the code below into your .htaccess file:
Turn off directory indexing This mod hits two birds with one stone, improving speed and privacy.
By default, any visitor can actually look inside any directory that doesn’t have an index file (index.html, index.php, etc.) in it. That means configuration files and other sensitive data could potentially be up for grabs to malicious users.
Unless you want to add a blank index.html file to every folder on your website (and trust future developers to do the same), take the easy road and modify your .htaccess file instead. In the process, you’ll be saving a bit of server resources – especially if you have very large directories. To turn off directory indexing, open your .htaccess file and add:
#Disable Directory Indexes
Options -Indexes
Prevent hotlinking Have you ever had the option to display an image from another website via URL? That’s called hotlinking, and it actually eats up bandwidth on the host’s server. Thankfully, it’s possible to prevent other domains from hotlinking to your website. To ensure nobody is using your precious bandwidth, add this script to your .htaccess file:
#Prevent Hot Linking
RewriteEngine on
RewriteCond %{HTTP_REFERER} !^$
RewriteCond %{HTTP_REFERER} !^http(s)?://(www\.)?yourdomain.com [NC]
RewriteRule \.(jpg|jpeg|png|gif)$ - [NC,F,L]
Force files to download instead of open in browser If your site serves a lot of media files, speed is a top priority. If it’s practical for your users to download files to their hard drives once rather than stream repeatedly from your website, this mod will save your bandwidth:
#Force certain types of files to download instead of load in browser
#Only include filetypes that you want to download automatically
AddType application/octet-stream .csv
AddType application/octet-stream .xls
AddType application/octet-stream .doc
AddType application/octet-stream .avi
AddType application/octet-stream .mpg
AddType application/octet-stream .mov
AddType application/octet-stream .pdf
Deny bad bots Your public website is constantly being crawled and scraped by bots. Some of these bots are essential – they index your site so it will show in search results. However, there are plenty of bots that aren’t so friendly. Spam bots and scrapers might be bogging down your server, using up bandwidth and resources.. We can block bots based on the user-agent they provide.
The script below denies some bad bots, but isn’t exhaustive. Look to AskApache for resources to help identify more bad bots to block, and use our script as a template if you prefer to add more:
You can test to see that it’s working by changing your user-agent in Google Chrome. In the developer tools, go to Settings->Overrides->Useragent. Setting your Useragent to one of the blocked bots, then visit your site. You should get a 403 denied error.
Deny malicious IPs Nothing slows down a site quite like a server attack. If you know the IP address of a user who is trying to break into or abuse your website, you can deny a specific IP, IP blocks, or domains with .htaccess:
#Deny Malicious IPs
order allow,deny
#deny single IP
deny from 1.1.1.1
#deny IP block deny from 1.1.1.
allow from all
Putting It All Together
Eager to use every tool possible to speed up your site in .htaccess? We put everything together for you here:
#Block Bad Bots – This is a small list. You can add bots to it. RewriteCond %{HTTP_USER_AGENT} ^WebBandit [OR] RewriteCond %{HTTP_USER_AGENT} ^2icommerce [OR] RewriteCond %{HTTP_USER_AGENT} ^Accoona [OR] RewriteCond %{HTTP_USER_AGENT} ^ActiveTouristBot [OR] RewriteCond %{HTTP_USER_AGENT} ^addressendeutshland RewriteRule ^.* – [F,L] </IfModule>
# Set up caching on static resources for 1 year based on Google recommendations <IfModule mod_expires.c> ExpiresActive On <FilesMatch “\.(flv|ico|pdf|avi|mov|ppt|doc|mp3|wmv|wav|js|css|gif|jpg|jpeg|png|swf)$”> ExpiresDefault A29030400 </FilesMatch> </IfModule>
Sitemaps are an ingredient that completes a website’s SEO package. They are certainly still relevant, since they ensure content is not overlooked by web crawlers and reduce the resource burden on search engines. Sitemaps are a way to “spoon feed” search engines your content to ensure better crawling. Let’s look at how this is done.
XML Format
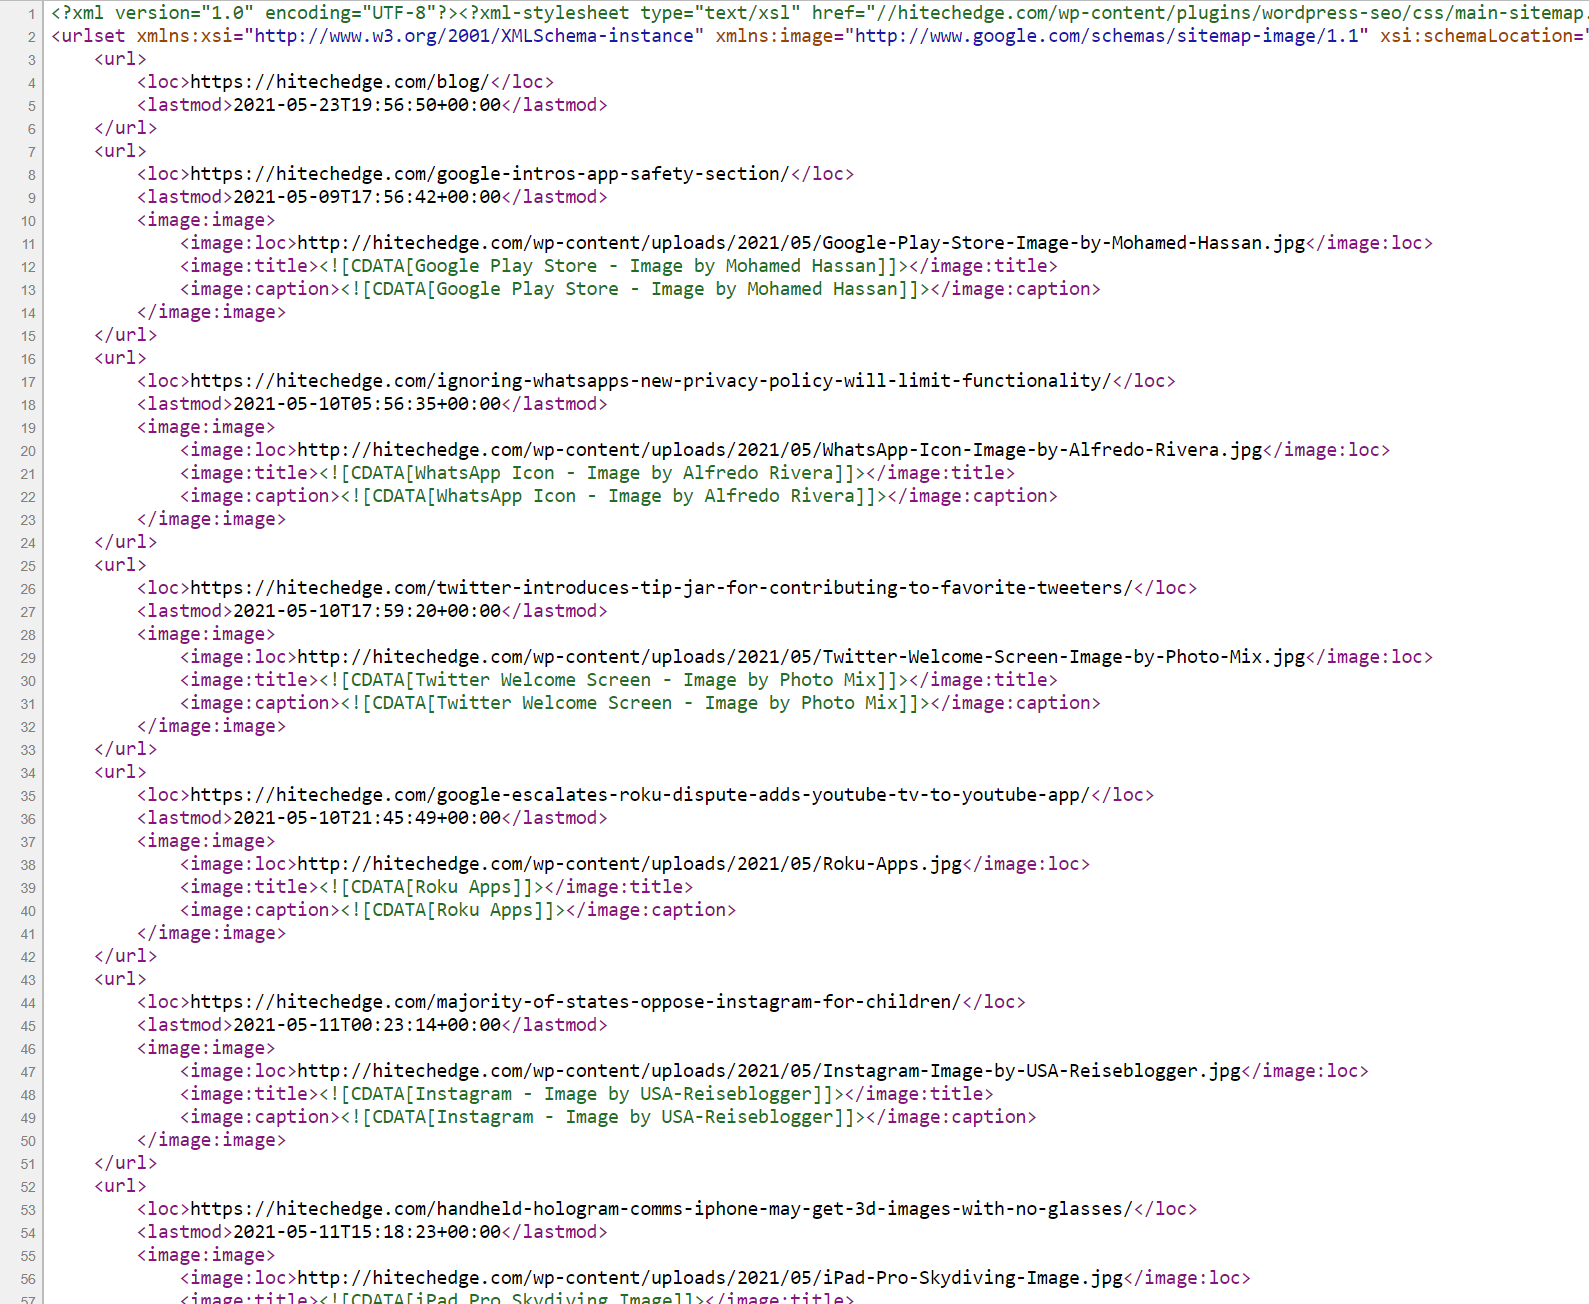
The sitemap file is what search engines look for. The elements available to an XML sitemap are defined by the sitemap protocol and include urlset, url, loc, lastmod, changefreq, and priority. An example DOM looks like:
    http://example.com/
    2006-11-18
    daily
    0.8
Sitemaps have a 10 MB size limit and cannot have more than 50,000 links, but you can use more than one file for the sitemap. A sitemap that consists of multiple files is called a sitemap index. Sitemap index files have a similar, but different format:
There are all kinds of sitemaps, ones for web pages, ones tailored to sites with videos and other media, mobile, geo data, and more. As long as it is within the cost-benefit for achieving better SEO, take the time to become familiar with the different types of sitemaps and make one that best fits your website’s architecture.
Location
Sitemaps can be named anything, but convention is that a sitemap will be named ‘sitemap.xml’ and is placed in the root of the site, so http://example.com/sitemap.xml. If multiple files are needed they can be named ‘sitemap1.xml’ and ‘sitemap2.xml’. Sitemap files can also be compressed, such as ‘sitemap.gz’. One can also have sitemaps in sub directories or submit them for multiple domains, but the cases for needing such are very limited.
Submission
Sitemaps are recognized by search engines in three ways:
First, sitemaps can be specified in the robots.txt as follows: Sitemap: http://example.com/sitemap.xml
The robots.txt file is then placed in the root of the domain, http://example.com/robots.txt, and when crawlers read the file they will find the sitemap and use it to improve their understanding of the website’s layout.
Second, search engines can be notified through “ping” requests, such as: http://searchengine.com/ping?sitemap=http%3A%2F%2Fwww.yoursite.com%2Fsitemap.xml
These “ping” requests are a standard way search engines allow websites to notify them of updated content. Obviously, the domain (i.e. “searchengine.com”) will be replaced with say “google.com”.
Lastly, every major search engine has a submission tool for notifying the engine that a website’s sitemap has changed. Here are four major search engines and their submission URLs:
Google – http://www.google.com/webmasters/tools/ping?sitemap=
The ping requests do not respond with any information besides whether or not the request was received. The submission URLs will respond with information about the sitemap, such as any errors it found.
If your website uses WordPress or the like, there are great plugins such as Google XML Sitemaps which will do all this heavy work for you: creating sitemaps and notifying search engines including Google, Bing, Yahoo, and Ask. There are also tools for creating sitemaps such as the XML-Sitemaps.com tool or Google’s Webmaster Tools.
As we’ve said before, making sitemaps “shouldn’t take precedence over good internal linking, inbound link acquisition, a proper title structure, or content that makes your site a resource and not just a list of pages.” However, taking just a little bit of time with a good tool will help you complete your SEO package with a sitemap. Take this tutorial and make your site known!
In this tutorial I will run you through some very simple steps on creating a rollover button by using Photoshop, CSS, and HTML.
In a previous tutorial I showed you how to create a social networking sticker icon, so I am going to use that in this tutorial.
For this tutorial you will need photoshop or equivalent and also an html software such as Dreamweaver, which is what I will be using.
The first step is to open up your image and save two images. The first image will be the sticker and the second image will be a sticker that has been peeled back.
To make this easier here is the .psd file for this tutorial.
Open up the .psd file and you will see layers in your palette.
And this on your canvas:
You can see the fold layer is showing on top of the sticker so you can hide that layer by clicking the little eye icon beside the layer in your palette window.
As you can see there is still a layer showing that does not need to be for our first image so hide the layer underneath the group “twitter”
After that you should have the first sticker image ready for saving. I am going to save my images as .png files so they can be transparent on any background color. To save an image as a .png file hide your background layer so there is no white background behind the sticker.
Once you hide your background layer you should see little blocks behind the sticker:
Now go to file>>save for web… or use the keyboard shortcut Alt+Shift+Ctrl+S
When you use that featured it will open a window where you can choose what file type you want to save the image as.
Go to the right side and in the drop down choose png-24 …
Save all of these files in the same folder because this will make the tutorial easier later.
So I will save mine as rollover1.png
For the 2nd image unhide the two layers we previously hid and hide the other layers except for the “twitter” group.
Now I will save this file as rollover2.png
That is all we need to do in photoshop, now I will move on to my HTML editing software dreamweaver mx.
I will hit ctrl+n in dreamweaver to start a new document and pick a basic page as html.
Then I will go ahead and save my html file in the same folder as my images called rolloverbutton-tutorial.html
One thing I really like about dreamweaver is how the screen is split into a design view and a code view. At the top is the code view and here is what it contains as default.
<!DOCTYPE HTML PUBLIC "-//W3C//DTD HTML 4.01 Transitional//EN">
<html>

<head>
    <title>Untitled Document</title>
    <meta http-equiv="Content-Type" content="text/html; charset=iso-8859-1"> </head>

<body> </body>
Next between the “body” tags in my code view I am going to write “Twitter”…
<!DOCTYPE HTML PUBLIC "-//W3C//DTD HTML 4.01 Transitional//EN">
<html>

<head>
    <title>Untitled Document</title>
    <meta http-equiv="Content-Type" content="text/html; charset=iso-8859-1"> </head>

<body> Twitter </body>
I want the Twitter text to have a clickable link over it so in my html program I will highlight the text in design view
Now in the properties of at the bottom of my window I will type in http://www.twitter.com
Now you can see the link is clickable in the design view and also an “a href” tag was added around the text in the code view.
<!DOCTYPE HTML PUBLIC "-//W3C//DTD HTML 4.01 Transitional//EN">
<html>

<head>
    <title>Untitled Document</title>
    <meta http-equiv="Content-Type" content="text/html; charset=iso-8859-1"> </head>

<body> <a href="http://www.twitter.com">Twitter</a> </body>
Next I will start creating the stylesheet needed for the rollover button. You can do an external stylesheet or one directly in the html. I will show you the one directly in the html since this is a beginner css tutorial.
Under your </head> tag write <style type=”text/css”> and when you do that in dreamweaver a closing tag will automatically generate </style>
After doing that I currently have this in my code now
<!DOCTYPE HTML PUBLIC "-//W3C//DTD HTML 4.01 Transitional//EN">
<html>

<head>
    <title>Untitled Document</title>
    <meta http-equiv="Content-Type" content="text/html; charset=iso-8859-1"> </head>
<style type="text/css">
</style>

<body> <a href="http://www.twitter.com">Twitter</a> </body>
The coding for the rollover will be very simple. I want to add a div tag around the text so I can control it with CSS styles. So you need to decide what you want to call the div that will surround the “Twitter” text. I will call mine “rollovericons”.
So above your twitter text write <div class=”rollovericons”> .. The class is telling the html which css style to use.
Yet again dreamweaver will create a closing tag automatically and put it after the the div just made. So put the closing div under the twitter text a href tag.
<!DOCTYPE HTML PUBLIC "-//W3C//DTD HTML 4.01 Transitional//EN">
<html>

<head>
    <title>Untitled Document</title>
    <meta http-equiv="Content-Type" content="text/html; charset=iso-8859-1"> </head>
<style type="text/css">
</style>

<body>
    <div class="rollovericons"> <a href="http://www.twitter.com">Twitter</a> </div>
</body>
Now its time to define some styles to use in the html. In the next code view I will show you all the css I created for this document and explain it from there. I will put little comments in the actual code view.
<!DOCTYPE HTML PUBLIC "-//W3C//DTD HTML 4.01 Transitional//EN">
<html>

<head>
<title>Untitled Document</title>
<meta http-equiv="Content-Type" content="text/html; charset=iso-8859-1"> </head>
<style type="text/css">
.rollovericons a#twitter{ /* This will be the main css that defines what the link on the Twitter text will do since it has an a href tag around it. the #twitter is an ID that will be placed in the a href tag */ display: block; /* this tells the a href link to display as an area so the image will show up correctly. */ width:193px; /* defniing the width of the icon image */ height:192px; /* defniing the height of the icon image */ background: url(rollover1.png) no-repeat; /* this tells the path to display for the image */ } .rollovericons a:hover#twitter{ /* this will define what happens to the a href link when when you roll over it with the mouse */ background: url(rollover2.png) no-repeat; /* this tells the path to display for the image */ } .rollovericons a span{ /* this will be another tag placed around the twitter text a href tag to make the font disapear */ display: none; }
</style>

<body>
<div class="rollovericons"> <a href="http://www.twitter.com">Twitter</a> </div>
</body>
Here is what I will add to the twitter text, <a href=”http://www.twitter.com” id=”twitter” title=”Join Us On Twitter!”><span>Twitter</span></a>Now that you defined your CSS you just need to add a few things in the twitter text a href to get it to display the icon correctly.
The id=”twitter” is the part of the css that has #twitter and the span added will make the font disapear. Also the title that says “Join Us On Twitter!” will pop up when highlighting over the button.
Here is the final working code:
<!DOCTYPE HTML PUBLIC "-//W3C//DTD HTML 4.01 Transitional//EN">
<html>

<head>
<title>Rollover Icon Tutorial</title>
<meta http-equiv="Content-Type" content="text/html; charset=iso-8859-1"> </head>
<style type="text/css">
.rollovericons a#twitter{ display: block; width:193px; height:192px; background: url(rollover1.png) no-repeat; } .rollovericons a:hover#twitter{ background: url(rollover2.png) no-repeat; } .rollovericons a span{ display: none; }
</style>

<body>
<div class="rollovericons"> <a href="http://www.twitter.com" id="twitter" title="Join Us On Twitter!"><span>Twitter</span></a> </div>
</body>
Now if I preview my html I will see thisAs long as you save your html document and images in the same folder the images should show up fine.